Diffusers documentation
End-to-End Developer Guide: Building with Modular Diffusers
End-to-End Developer Guide: Building with Modular Diffusers
🧪 Experimental Feature: Modular Diffusers is an experimental feature we are actively developing. The API may be subject to breaking changes.
In this tutorial we will walk through the process of adding a new pipeline to the modular framework using differential diffusion as our example. We’ll cover the complete workflow from implementation to deployment: implementing the new pipeline, ensuring compatibility with existing tools, sharing the code on Hugging Face Hub, and deploying it as a UI node.
We’ll also demonstrate the 4-step framework process we use for implementing new basic pipelines in the modular system.
Start with an existing pipeline as a base
- Identify which existing pipeline is most similar to the one you want to implement
- Determine what part of the pipeline needs modification
Build a working pipeline structure first
- Assemble the complete pipeline structure
- Use existing blocks wherever possible
- For new blocks, create placeholders (e.g. you can copy from similar blocks and change the name) without implementing custom logic just yet
Set up an example
- Create a simple inference script with expected inputs/outputs
Implement your custom logic and test incrementally
- Add the custom logics the blocks you want to change
- Test incrementally, and inspect pipeline states and debug as needed
Let’s see how this works with the Differential Diffusion example.
Differential Diffusion Pipeline
Start with an existing pipeline
Differential diffusion (https://differential-diffusion.github.io/) is an image-to-image workflow, so it makes sense for us to start with the preset of pipeline blocks used to build img2img pipeline (IMAGE2IMAGE_BLOCKS) and see how we can build this new pipeline with them.
>>> from diffusers.modular_pipelines.stable_diffusion_xl import IMAGE2IMAGE_BLOCKS
>>> IMAGE2IMAGE_BLOCKS = InsertableDict([
...     ("text_encoder", StableDiffusionXLTextEncoderStep),
...     ("image_encoder", StableDiffusionXLVaeEncoderStep),
...     ("input", StableDiffusionXLInputStep),
...     ("set_timesteps", StableDiffusionXLImg2ImgSetTimestepsStep),
...     ("prepare_latents", StableDiffusionXLImg2ImgPrepareLatentsStep),
...     ("prepare_add_cond", StableDiffusionXLImg2ImgPrepareAdditionalConditioningStep),
...     ("denoise", StableDiffusionXLDenoiseStep),
...     ("decode", StableDiffusionXLDecodeStep)
... ])
Note that “denoise” (StableDiffusionXLDenoiseStep) is a LoopSequentialPipelineBlocks that contains 3 loop blocks (more on LoopSequentialPipelineBlocks here)
>>> denoise_blocks = IMAGE2IMAGE_BLOCKS["denoise"]()
>>> print(denoise_blocks)StableDiffusionXLDenoiseStep(
Class: StableDiffusionXLDenoiseLoopWrapper
Description: Denoise step that iteratively denoise the latents.
Its loop logic is defined in `StableDiffusionXLDenoiseLoopWrapper.__call__` method
At each iteration, it runs blocks defined in `sub_blocks` sequencially:
- `StableDiffusionXLLoopBeforeDenoiser`
- `StableDiffusionXLLoopDenoiser`
- `StableDiffusionXLLoopAfterDenoiser`
This block supports both text2img and img2img tasks.
Components:
scheduler (`EulerDiscreteScheduler`)
guider (`ClassifierFreeGuidance`)
unet (`UNet2DConditionModel`)
Sub-Blocks:
[0] before_denoiser (StableDiffusionXLLoopBeforeDenoiser)
Description: step within the denoising loop that prepare the latent input for the denoiser. This block should be used to compose the `sub_blocks` attribute of a `LoopSequentialPipelineBlocks` object (e.g. `StableDiffusionXLDenoiseLoopWrapper`)
[1] denoiser (StableDiffusionXLLoopDenoiser)
Description: Step within the denoising loop that denoise the latents with guidance. This block should be used to compose the `sub_blocks` attribute of a `LoopSequentialPipelineBlocks` object (e.g. `StableDiffusionXLDenoiseLoopWrapper`)
[2] after_denoiser (StableDiffusionXLLoopAfterDenoiser)
Description: step within the denoising loop that update the latents. This block should be used to compose the `sub_blocks` attribute of a `LoopSequentialPipelineBlocks` object (e.g. `StableDiffusionXLDenoiseLoopWrapper`)
)Let’s compare standard image-to-image and differential diffusion! The key difference in algorithm is that standard image-to-image diffusion applies uniform noise across all pixels based on a single strength parameter, but differential diffusion uses a change map where each pixel value determines when that region starts denoising. Regions with lower values get “frozen” earlier by replacing them with noised original latents, preserving more of the original image.
Therefore, the key differences when it comes to pipeline implementation would be:
- The
prepare_latentsstep (which prepares the change map and pre-computes noised latents for all timesteps) - The
denoisestep (which selectively applies denoising based on the change map) - Since differential diffusion doesn’t use the
strengthparameter, we’ll use the text-to-imageset_timestepsstep instead of the image-to-image version
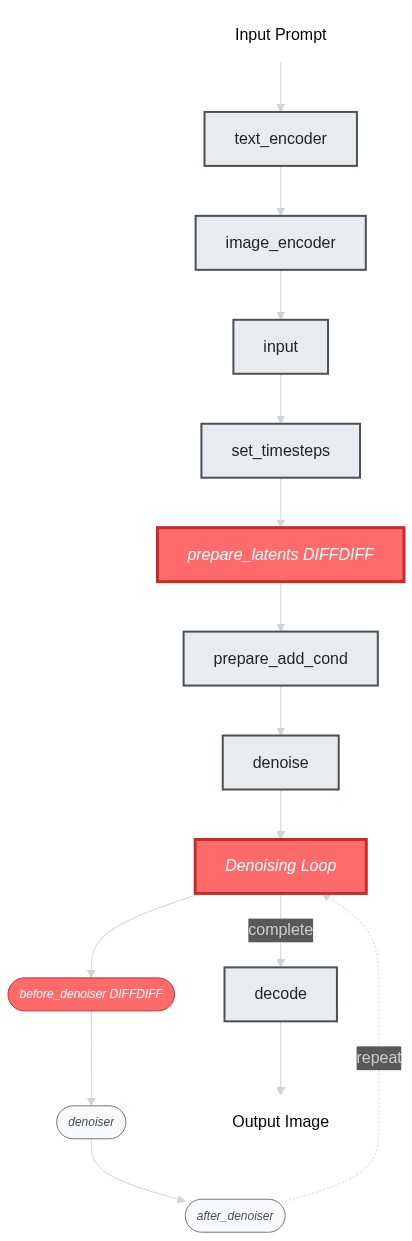
To implement differntial diffusion, we can reuse most blocks from image-to-image and text-to-image workflows, only modifying the prepare_latents step and the first part of the denoise step (i.e. before_denoiser (StableDiffusionXLLoopBeforeDenoiser)).
Here’s a flowchart showing the pipeline structure and the changes we need to make:
Build a Working Pipeline Structure
ok now we’ve identified the blocks to modify, let’s build the pipeline skeleton first - at this stage, our goal is to get the pipeline struture working end-to-end (even though it’s just doing the img2img behavior). I would simply create placeholder blocks by copying from existing ones:
>>> # Copy existing blocks as placeholders
>>> class SDXLDiffDiffPrepareLatentsStep(PipelineBlock):
...     """Copied from StableDiffusionXLImg2ImgPrepareLatentsStep - will modify later"""
...     # ... same implementation as StableDiffusionXLImg2ImgPrepareLatentsStep
...
>>> class SDXLDiffDiffLoopBeforeDenoiser(PipelineBlock):
...     """Copied from StableDiffusionXLLoopBeforeDenoiser - will modify later"""
...     # ... same implementation as StableDiffusionXLLoopBeforeDenoiser
SDXLDiffDiffLoopBeforeDenoiser is the be part of the denoise loop we need to change. Let’s use it to assemble a SDXLDiffDiffDenoiseStep.
>>> class SDXLDiffDiffDenoiseStep(StableDiffusionXLDenoiseLoopWrapper):
...     block_classes = [SDXLDiffDiffLoopBeforeDenoiser, StableDiffusionXLLoopDenoiser, StableDiffusionXLLoopAfterDenoiser]
...     block_names = ["before_denoiser", "denoiser", "after_denoiser"]
Now we can put together our differential diffusion pipeline.
>>> DIFFDIFF_BLOCKS = IMAGE2IMAGE_BLOCKS.copy()
>>> DIFFDIFF_BLOCKS["set_timesteps"] = TEXT2IMAGE_BLOCKS["set_timesteps"]
>>> DIFFDIFF_BLOCKS["prepare_latents"] = SDXLDiffDiffPrepareLatentsStep
>>> DIFFDIFF_BLOCKS["denoise"] = SDXLDiffDiffDenoiseStep
>>>
>>> dd_blocks = SequentialPipelineBlocks.from_blocks_dict(DIFFDIFF_BLOCKS)
>>> print(dd_blocks)
>>> # At this point, the pipeline works exactly like img2img since our blocks are just copies
Set up an example
ok, so now our blocks should be able to compile without an error, we can move on to the next step. Let’s setup a simple example so we can run the pipeline as we build it. diff-diff use same model checkpoints as SDXL so we can fetch the models from a regular SDXL repo.
>>> dd_pipeline = dd_blocks.init_pipeline("YiYiXu/modular-demo-auto", collection="diffdiff")
>>> dd_pipeline.load_default_componenets(torch_dtype=torch.float16)
>>> dd_pipeline.to("cuda")
We will use this example script:
>>> image = load_image("https://huggingface.co/datasets/OzzyGT/testing-resources/resolve/main/differential/20240329211129_4024911930.png?download=true")
>>> mask = load_image("https://huggingface.co/datasets/OzzyGT/testing-resources/resolve/main/differential/gradient_mask.png?download=true")
>>>
>>> prompt = "a green pear"
>>> negative_prompt = "blurry"
>>>
>>> image = dd_pipeline(
...     prompt=prompt,
...     negative_prompt=negative_prompt,
...     num_inference_steps=25,
...     diffdiff_map=mask,
...     image=image,
...     output="images"
... )[0]
>>>
>>> image.save("diffdiff_out.png")
If you run the script right now, you will get a complaint about unexpected input diffdiff_map.
and you would get the same result as the original img2img pipeline.
implement your custom logic and test incrementally
Let’s modify the pipeline so that we can get expected result with this example script.
We’ll start with the prepare_latents step. The main changes are:
- Requires a new user input
diffdiff_map - Requires new component
mask_processorto process thediffdiff_map - Requires new intermediate inputs:
- Need
timestepinstead oflatent_timestepto precompute all the latents - Need
num_inference_stepsto create thediffdiff_masks
- Need
- create a new output
diffdiff_masksandoriginal_latents
💡 use print(dd_pipeline.doc) to check compiled inputs and outputs of the built piepline.
e.g. after we added diffdiff_map as an input in this step, we can run print(dd_pipeline.doc) to verify that it shows up in the docstring as a user input.
Once we make sure all the variables we need are available in the block state, we can implement the diff-diff logic inside __call__. We created 2 new variables: the change map diffdiff_mask and the pre-computed noised latents for all timesteps original_latents.
💡 Implement incrementally! Run the example script as you go, and insert print(state) and print(block_state) everywhere inside the __call__ method to inspect the intermediate results. This helps you understand what’s going on and what each line you just added does.
Here are the key changes we made to implement differential diffusion:
1. Modified prepare_latents step:
class SDXLDiffDiffPrepareLatentsStep(PipelineBlock):
    @property
    def expected_components(self) -> List[ComponentSpec]:
        return [
            ComponentSpec("vae", AutoencoderKL),
            ComponentSpec("scheduler", EulerDiscreteScheduler),
+           ComponentSpec("mask_processor", VaeImageProcessor, config=FrozenDict({"do_normalize": False, "do_convert_grayscale": True}))
        ]

    @property
    def inputs(self) -> List[Tuple[str, Any]]:
        return [
+           InputParam("diffdiff_map", required=True),
        ]

    @property
    def intermediate_inputs(self) -> List[InputParam]:
        return [
            InputParam("generator"),
-           InputParam("latent_timestep", required=True, type_hint=torch.Tensor),
+           InputParam("timesteps", type_hint=torch.Tensor),
+           InputParam("num_inference_steps", type_hint=int),
        ]

    @property
    def intermediate_outputs(self) -> List[OutputParam]:
        return [
+           OutputParam("original_latents", type_hint=torch.Tensor),
+           OutputParam("diffdiff_masks", type_hint=torch.Tensor),
        ]

    def __call__(self, components, state: PipelineState):
        # ... existing logic ...
+       # Process change map and create masks
+       diffdiff_map = components.mask_processor.preprocess(block_state.diffdiff_map, height=latent_height, width=latent_width)
+       thresholds = torch.arange(block_state.num_inference_steps, dtype=diffdiff_map.dtype) / block_state.num_inference_steps
+       block_state.diffdiff_masks = diffdiff_map > (thresholds + (block_state.denoising_start or 0))
+       block_state.original_latents = block_state.latents
2. Modified before_denoiser step:
class SDXLDiffDiffLoopBeforeDenoiser(PipelineBlock):
    @property
    def description(self) -> str:
        return (
            "Step within the denoising loop for differential diffusion that prepare the latent input for the denoiser"
        )

+   @property
+   def inputs(self) -> List[Tuple[str, Any]]:
+       return [
+           InputParam("denoising_start"),
+       ]

    @property
    def intermediate_inputs(self) -> List[str]:
        return [
            InputParam("latents", required=True, type_hint=torch.Tensor),
+           InputParam("original_latents", type_hint=torch.Tensor),
+           InputParam("diffdiff_masks", type_hint=torch.Tensor),
        ]

    def __call__(self, components, block_state, i, t):
+       # Apply differential diffusion logic
+       if i == 0 and block_state.denoising_start is None:
+           block_state.latents = block_state.original_latents[:1]
+       else:
+           block_state.mask = block_state.diffdiff_masks[i].unsqueeze(0).unsqueeze(1)
+           block_state.latents = block_state.original_latents[i] * block_state.mask + block_state.latents * (1 - block_state.mask)

        # ... rest of existing logic ...
That’s all there is to it! We’ve just created a simple sequential pipeline by mix-and-match some existing and new pipeline blocks.
Now we use the process we’ve prepred in step2 to build the pipeline and inspect it.
>> dd_pipeline
SequentialPipelineBlocks(
  Class: ModularPipelineBlocks

  Description:


  Components:
      text_encoder (`CLIPTextModel`)
      text_encoder_2 (`CLIPTextModelWithProjection`)
      tokenizer (`CLIPTokenizer`)
      tokenizer_2 (`CLIPTokenizer`)
      guider (`ClassifierFreeGuidance`)
      vae (`AutoencoderKL`)
      image_processor (`VaeImageProcessor`)
      scheduler (`EulerDiscreteScheduler`)
      mask_processor (`VaeImageProcessor`)
      unet (`UNet2DConditionModel`)

  Configs:
      force_zeros_for_empty_prompt (default: True)
      requires_aesthetics_score (default: False)

  Blocks:
    [0] text_encoder (StableDiffusionXLTextEncoderStep)
       Description: Text Encoder step that generate text_embeddings to guide the image generation

    [1] image_encoder (StableDiffusionXLVaeEncoderStep)
       Description: Vae Encoder step that encode the input image into a latent representation

    [2] input (StableDiffusionXLInputStep)
       Description: Input processing step that:
                     1. Determines `batch_size` and `dtype` based on `prompt_embeds`
                     2. Adjusts input tensor shapes based on `batch_size` (number of prompts) and `num_images_per_prompt`

                   All input tensors are expected to have either batch_size=1 or match the batch_size
                   of prompt_embeds. The tensors will be duplicated across the batch dimension to
                   have a final batch_size of batch_size * num_images_per_prompt.

    [3] set_timesteps (StableDiffusionXLSetTimestepsStep)
       Description: Step that sets the scheduler's timesteps for inference

    [4] prepare_latents (SDXLDiffDiffPrepareLatentsStep)
       Description: Step that prepares the latents for the differential diffusion generation process

    [5] prepare_add_cond (StableDiffusionXLImg2ImgPrepareAdditionalConditioningStep)
       Description: Step that prepares the additional conditioning for the image-to-image/inpainting generation process

    [6] denoise (SDXLDiffDiffDenoiseStep)
       Description: Pipeline block that iteratively denoise the latents over `timesteps`. The specific steps with each iteration can be customized with `sub_blocks` attributes

    [7] decode (StableDiffusionXLDecodeStep)
       Description: Step that decodes the denoised latents into images

)
Run the example now, you should see an apple with its right half transformed into a green pear.

Adding IP-adapter
We provide an auto IP-adapter block that you can plug-and-play into your modular workflow. It’s an AutoPipelineBlocks, so it will only run when the user passes an IP adapter image. In this tutorial, we’ll focus on how to package it into your differential diffusion workflow. To learn more about AutoPipelineBlocks, see here
We talked about how to add IP-adapter into your workflow in the Modular Pipeline Guide. Let’s just go ahead to create the IP-adapter block.
>>> from diffusers.modular_pipelines.stable_diffusion_xl.encoders import StableDiffusionXLAutoIPAdapterStep
>>> ip_adapter_block = StableDiffusionXLAutoIPAdapterStep()
We can directly add the ip-adapter block instance to the diffdiff_blocks that we created before. The sub_blocks attribute is a InsertableDict, so we’re able to insert the it at specific position (index 0 here).
>>> dd_blocks.sub_blocks.insert("ip_adapter", ip_adapter_block, 0)Take a look at the new diff-diff pipeline with ip-adapter!
>>> print(dd_blocks)The pipeline now lists ip-adapter as its first block, and tells you that it will run only if ip_adapter_image is provided. It also includes the two new components from ip-adpater: image_encoder and feature_extractor
SequentialPipelineBlocks(
  Class: ModularPipelineBlocks

  ====================================================================================================
  This pipeline contains blocks that are selected at runtime based on inputs.
  Trigger Inputs: {'ip_adapter_image'}
  Use `get_execution_blocks()` with input names to see selected blocks (e.g. `get_execution_blocks('ip_adapter_image')`).
  ====================================================================================================


  Description:


  Components:
      image_encoder (`CLIPVisionModelWithProjection`)
      feature_extractor (`CLIPImageProcessor`)
      unet (`UNet2DConditionModel`)
      guider (`ClassifierFreeGuidance`)
      text_encoder (`CLIPTextModel`)
      text_encoder_2 (`CLIPTextModelWithProjection`)
      tokenizer (`CLIPTokenizer`)
      tokenizer_2 (`CLIPTokenizer`)
      vae (`AutoencoderKL`)
      image_processor (`VaeImageProcessor`)
      scheduler (`EulerDiscreteScheduler`)
      mask_processor (`VaeImageProcessor`)

  Configs:
      force_zeros_for_empty_prompt (default: True)
      requires_aesthetics_score (default: False)

  Blocks:
    [0] ip_adapter (StableDiffusionXLAutoIPAdapterStep)
       Description: Run IP Adapter step if `ip_adapter_image` is provided.

    [1] text_encoder (StableDiffusionXLTextEncoderStep)
       Description: Text Encoder step that generate text_embeddings to guide the image generation

    [2] image_encoder (StableDiffusionXLVaeEncoderStep)
       Description: Vae Encoder step that encode the input image into a latent representation

    [3] input (StableDiffusionXLInputStep)
       Description: Input processing step that:
                     1. Determines `batch_size` and `dtype` based on `prompt_embeds`
                     2. Adjusts input tensor shapes based on `batch_size` (number of prompts) and `num_images_per_prompt`

                   All input tensors are expected to have either batch_size=1 or match the batch_size
                   of prompt_embeds. The tensors will be duplicated across the batch dimension to
                   have a final batch_size of batch_size * num_images_per_prompt.

    [4] set_timesteps (StableDiffusionXLSetTimestepsStep)
       Description: Step that sets the scheduler's timesteps for inference

    [5] prepare_latents (SDXLDiffDiffPrepareLatentsStep)
       Description: Step that prepares the latents for the differential diffusion generation process

    [6] prepare_add_cond (StableDiffusionXLImg2ImgPrepareAdditionalConditioningStep)
       Description: Step that prepares the additional conditioning for the image-to-image/inpainting generation process

    [7] denoise (SDXLDiffDiffDenoiseStep)
       Description: Pipeline block that iteratively denoise the latents over `timesteps`. The specific steps with each iteration can be customized with `sub_blocks` attributes

    [8] decode (StableDiffusionXLDecodeStep)
       Description: Step that decodes the denoised latents into images

)
Let’s test it out. We used an orange image to condition the generation via ip-addapter and we can see a slight orange color and texture in the final output.
>>> ip_adapter_block = StableDiffusionXLAutoIPAdapterStep()
>>> dd_blocks.sub_blocks.insert("ip_adapter", ip_adapter_block, 0)
>>>
>>> dd_pipeline = dd_blocks.init_pipeline("YiYiXu/modular-demo-auto", collection="diffdiff")
>>> dd_pipeline.load_default_components(torch_dtype=torch.float16)
>>> dd_pipeline.loader.load_ip_adapter("h94/IP-Adapter", subfolder="sdxl_models", weight_name="ip-adapter_sdxl.bin")
>>> dd_pipeline.loader.set_ip_adapter_scale(0.6)
>>> dd_pipeline = dd_pipeline.to(device)
>>>
>>> ip_adapter_image = load_image("https://huggingface.co/datasets/YiYiXu/testing-images/resolve/main/diffdiff_orange.jpeg")
>>> image = load_image("https://huggingface.co/datasets/OzzyGT/testing-resources/resolve/main/differential/20240329211129_4024911930.png?download=true")
>>> mask = load_image("https://huggingface.co/datasets/OzzyGT/testing-resources/resolve/main/differential/gradient_mask.png?download=true")
>>>
>>> prompt = "a green pear"
>>> negative_prompt = "blurry"
>>> generator = torch.Generator(device=device).manual_seed(42)
>>>
>>> image = dd_pipeline(
...     prompt=prompt,
...     negative_prompt=negative_prompt,
...     num_inference_steps=25,
...     generator=generator,
...     ip_adapter_image=ip_adapter_image,
...     diffdiff_map=mask,
...     image=image,
...     output="images"
... )[0]
Working with ControlNets
What about controlnet? Can differential diffusion work with controlnet? The key differences between a regular pipeline and a ControlNet pipeline are:
- A ControlNet input step that prepares the control condition
- Inside the denoising loop, a modified denoiser step where the control image is first processed through ControlNet, then control information is injected into the UNet
From looking at the code workflow: differential diffusion only modifies the “before denoiser” step, while ControlNet operates within the “denoiser” itself. Since they intervene at different points in the pipeline, they should work together without conflicts.
Intuitively, these two techniques are orthogonal and should combine naturally: differential diffusion controls how much the inference process can deviate from the original in each region, while ControlNet controls in what direction that change occurs.
With this understanding, let’s assemble the diffdiff-controlnet loop by combining the diffdiff before-denoiser step and controlnet denoiser step.
>>> class SDXLDiffDiffControlNetDenoiseStep(StableDiffusionXLDenoiseLoopWrapper):
...     block_classes = [SDXLDiffDiffLoopBeforeDenoiser, StableDiffusionXLControlNetLoopDenoiser, StableDiffusionXLDenoiseLoopAfterDenoiser]
...     block_names = ["before_denoiser", "denoiser", "after_denoiser"]
>>>
>>> controlnet_denoise_block = SDXLDiffDiffControlNetDenoiseStep()
>>> # print(controlnet_denoise)
We provide a auto controlnet input block that you can directly put into your workflow to proceess the control_image: similar to auto ip-adapter block, this step will only run if control_image input is passed from user. It work with both controlnet and controlnet union.
>>> from diffusers.modular_pipelines.stable_diffusion_xl.modular_blocks import StableDiffusionXLAutoControlNetInputStep
>>> control_input_block = StableDiffusionXLAutoControlNetInputStep()
>>> print(control_input_block)StableDiffusionXLAutoControlNetInputStep(
Class: AutoPipelineBlocks
====================================================================================================
This pipeline contains blocks that are selected at runtime based on inputs.
Trigger Inputs: ['control_image', 'control_mode']
====================================================================================================
Description: Controlnet Input step that prepare the controlnet input.
This is an auto pipeline block that works for both controlnet and controlnet_union.
(it should be called right before the denoise step) - `StableDiffusionXLControlNetUnionInputStep` is called to prepare the controlnet input when `control_mode` and `control_image` are provided.
- `StableDiffusionXLControlNetInputStep` is called to prepare the controlnet input when `control_image` is provided. - if neither `control_mode` nor `control_image` is provided, step will be skipped.
Components:
controlnet (`ControlNetUnionModel`)
control_image_processor (`VaeImageProcessor`)
Sub-Blocks:
• controlnet_union [trigger: control_mode] (StableDiffusionXLControlNetUnionInputStep)
Description: step that prepares inputs for the ControlNetUnion model
• controlnet [trigger: control_image] (StableDiffusionXLControlNetInputStep)
Description: step that prepare inputs for controlnet
)
Let’s assemble the blocks and run an example using controlnet + differential diffusion. We used a tomato as control_image, so you can see that in the output, the right half that transformed into a pear had a tomato-like shape.
>>> dd_blocks.sub_blocks.insert("controlnet_input", control_input_block, 7)
>>> dd_blocks.sub_blocks["denoise"] = controlnet_denoise_block
>>>
>>> dd_pipeline = dd_blocks.init_pipeline("YiYiXu/modular-demo-auto", collection="diffdiff")
>>> dd_pipeline.load_default_components(torch_dtype=torch.float16)
>>> dd_pipeline = dd_pipeline.to(device)
>>>
>>> control_image = load_image("https://huggingface.co/datasets/YiYiXu/testing-images/resolve/main/diffdiff_tomato_canny.jpeg")
>>> image = load_image("https://huggingface.co/datasets/OzzyGT/testing-resources/resolve/main/differential/20240329211129_4024911930.png?download=true")
>>> mask = load_image("https://huggingface.co/datasets/OzzyGT/testing-resources/resolve/main/differential/gradient_mask.png?download=true")
>>>
>>> prompt = "a green pear"
>>> negative_prompt = "blurry"
>>> generator = torch.Generator(device=device).manual_seed(42)
>>>
>>> image = dd_pipeline(
...     prompt=prompt,
...     negative_prompt=negative_prompt,
...     num_inference_steps=25,
...     generator=generator,
...     control_image=control_image,
...     controlnet_conditioning_scale=0.5,
...     diffdiff_map=mask,
...     image=image,
...     output="images"
... )[0]
Optionally, We can combine SDXLDiffDiffControlNetDenoiseStep and SDXLDiffDiffDenoiseStep into a AutoPipelineBlocks so that same workflow can work with or without controlnet.
>>> class SDXLDiffDiffAutoDenoiseStep(AutoPipelineBlocks):
...     block_classes = [SDXLDiffDiffControlNetDenoiseStep, SDXLDiffDiffDenoiseStep]
...     block_names = ["controlnet_denoise", "denoise"]
...     block_trigger_inputs = ["controlnet_cond", None]
SDXLDiffDiffAutoDenoiseStep will run the ControlNet denoise step if control_image input is provided, otherwise it will run the regular denoise step.
Note that it’s perfectly fine not to use AutoPipelineBlocks. In fact, we recommend only using AutoPipelineBlocks to package your workflow at the end once you’ve verified all your pipelines work as expected.
Now you can create the differential diffusion preset that works with ip-adapter & controlnet.
>>> DIFFDIFF_AUTO_BLOCKS = IMAGE2IMAGE_BLOCKS.copy()
>>> DIFFDIFF_AUTO_BLOCKS["prepare_latents"] = SDXLDiffDiffPrepareLatentsStep
>>> DIFFDIFF_AUTO_BLOCKS["set_timesteps"] = TEXT2IMAGE_BLOCKS["set_timesteps"]
>>> DIFFDIFF_AUTO_BLOCKS["denoise"] = SDXLDiffDiffAutoDenoiseStep
>>> DIFFDIFF_AUTO_BLOCKS.insert("ip_adapter", StableDiffusionXLAutoIPAdapterStep, 0)
>>> DIFFDIFF_AUTO_BLOCKS.insert("controlnet_input",StableDiffusionXLControlNetAutoInput, 7)
>>>
>>> print(DIFFDIFF_AUTO_BLOCKS)
to use
>>> dd_auto_blocks = SequentialPipelineBlocks.from_blocks_dict(DIFFDIFF_AUTO_BLOCKS)
>>> dd_pipeline = dd_auto_blocks.init_pipeline(...)
Creating a Modular Repo
You can easily share your differential diffusion workflow on the Hub by creating a modular repo. This is one created using the code we just wrote together: https://huggingface.co/YiYiXu/modular-diffdiff
To create a Modular Repo and share on hub, you just need to run save_pretrained() along with the push_to_hub=True flag. Note that if your pipeline contains custom block, you need to manually upload the code to the hub. But we are working on a command line tool to help you upload it very easily.
dd_pipeline.save_pretrained("YiYiXu/test_modular_doc", push_to_hub=True)With a modular repo, it is very easy for the community to use the workflow you just created! Here is an example to use the differential-diffusion pipeline we just created and shared.
>>> from diffusers.modular_pipelines import ModularPipeline, ComponentsManager
>>> import torch
>>> from diffusers.utils import load_image
>>>
>>> repo_id = "YiYiXu/modular-diffdiff-0704"
>>>
>>> components = ComponentsManager()
>>>
>>> diffdiff_pipeline = ModularPipeline.from_pretrained(repo_id, trust_remote_code=True, components_manager=components, collection="diffdiff")
>>> diffdiff_pipeline.load_default_components(torch_dtype=torch.float16)
>>> components.enable_auto_cpu_offload()
see more usage example on model card.
deploy a mellon node
[YIYI TODO: for now, here is an example of mellon node https://huggingface.co/YiYiXu/diff-diff-mellon]
< > Update on GitHub