# Video generation
Video generation models include a temporal dimension to bring images, or frames, together to create a video. These models are trained on large-scale datasets of high-quality text-video pairs to learn how to combine the modalities to ensure the generated video is coherent and realistic.
[Explore](https://huggingface.co/models?other=video-generation) some of the more popular open-source video generation models available from Diffusers below.
[CogVideoX](https://huggingface.co/collections/THUDM/cogvideo-66c08e62f1685a3ade464cce) uses a 3D causal Variational Autoencoder (VAE) to compress videos along the spatial and temporal dimensions, and it includes a stack of expert transformer blocks with a 3D full attention mechanism to better capture visual, semantic, and motion information in the data.
The CogVideoX family also includes models capable of generating videos from images and videos in addition to text. The image-to-video models are indicated by **I2V** in the checkpoint name, and they should be used with the [`CogVideoXImageToVideoPipeline`]. The regular checkpoints support video-to-video through the [`CogVideoXVideoToVideoPipeline`].
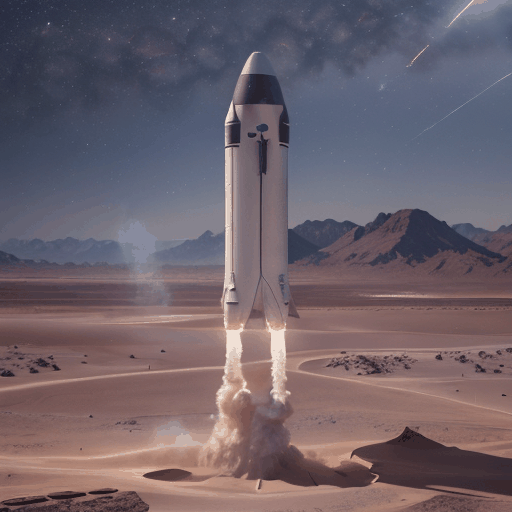
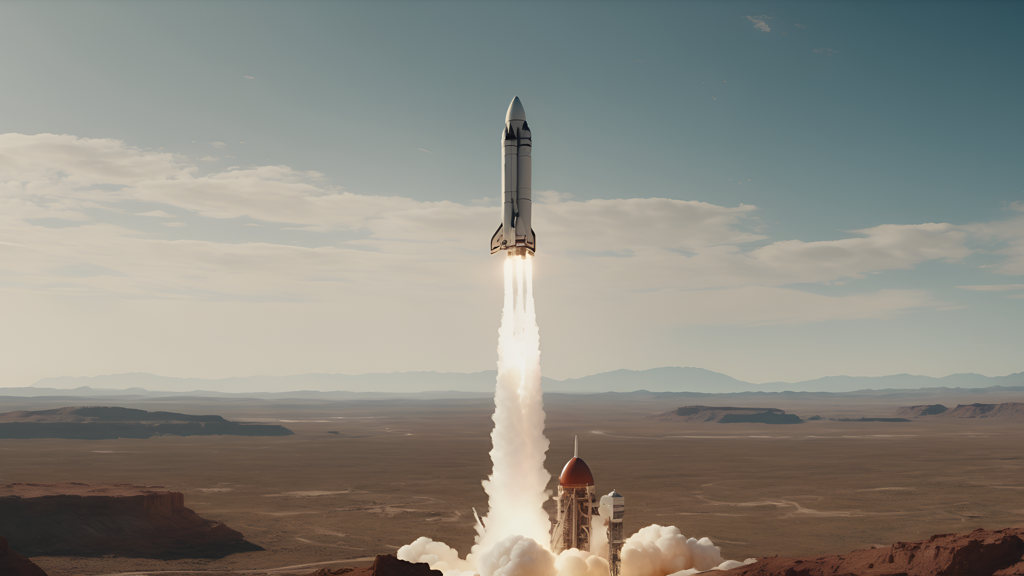
The example below demonstrates how to generate a video from an image and text prompt with [THUDM/CogVideoX-5b-I2V](https://huggingface.co/THUDM/CogVideoX-5b-I2V).
```py
import torch
from diffusers import CogVideoXImageToVideoPipeline
from diffusers.utils import export_to_video, load_image
prompt = "A vast, shimmering ocean flows gracefully under a twilight sky, its waves undulating in a mesmerizing dance of blues and greens. The surface glints with the last rays of the setting sun, casting golden highlights that ripple across the water. Seagulls soar above, their cries blending with the gentle roar of the waves. The horizon stretches infinitely, where the ocean meets the sky in a seamless blend of hues. Close-ups reveal the intricate patterns of the waves, capturing the fluidity and dynamic beauty of the sea in motion."
image = load_image(image="https://huggingface.co/datasets/huggingface/documentation-images/resolve/main/diffusers/cogvideox/cogvideox_rocket.png")
pipe = CogVideoXImageToVideoPipeline.from_pretrained(
"THUDM/CogVideoX-5b-I2V",
torch_dtype=torch.bfloat16
)
# reduce memory requirements
pipe.vae.enable_tiling()
pipe.vae.enable_slicing()
video = pipe(
prompt=prompt,
image=image,
num_videos_per_prompt=1,
num_inference_steps=50,
num_frames=49,
guidance_scale=6,
generator=torch.Generator(device="cuda").manual_seed(42),
).frames[0]
export_to_video(video, "output.mp4", fps=8)
```
 initial image
 generated video
> [!TIP]
> HunyuanVideo is a 13B parameter model and requires a lot of memory. Refer to the HunyuanVideo [Quantization](../api/pipelines/hunyuan_video#quantization) guide to learn how to quantize the model. CogVideoX and LTX-Video are more lightweight options that can still generate high-quality videos.
[HunyuanVideo](https://huggingface.co/tencent/HunyuanVideo) features a dual-stream to single-stream diffusion transformer (DiT) for learning video and text tokens separately, and then subsequently concatenating the video and text tokens to combine their information. A single multimodal large language model (MLLM) serves as the text encoder, and videos are also spatio-temporally compressed with a 3D causal VAE.
```py
import torch
from diffusers import HunyuanVideoPipeline, HunyuanVideoTransformer3DModel
from diffusers.utils import export_to_video
transformer = HunyuanVideoTransformer3DModel.from_pretrained(
"hunyuanvideo-community/HunyuanVideo", subfolder="transformer", torch_dtype=torch.bfloat16
)
pipe = HunyuanVideoPipeline.from_pretrained(
"hunyuanvideo-community/HunyuanVideo", transformer=transformer, torch_dtype=torch.float16
)
# reduce memory requirements
pipe.vae.enable_tiling()
pipe.to("cuda")
video = pipe(
prompt="A cat walks on the grass, realistic",
height=320,
width=512,
num_frames=61,
num_inference_steps=30,
).frames[0]
export_to_video(video, "output.mp4", fps=15)
```
[LTX-Video (LTXV)](https://huggingface.co/Lightricks/LTX-Video) is a diffusion transformer (DiT) with a focus on speed. It generates 768x512 resolution videos at 24 frames per second (fps), enabling near real-time generation of high-quality videos. LTXV is relatively lightweight compared to other modern video generation models, making it possible to run on consumer GPUs.
```py
import torch
from diffusers import LTXPipeline
from diffusers.utils import export_to_video
pipe = LTXPipeline.from_pretrained("Lightricks/LTX-Video", torch_dtype=torch.bfloat16).to("cuda")
prompt = "A man walks towards a window, looks out, and then turns around. He has short, dark hair, dark skin, and is wearing a brown coat over a red and gray scarf. He walks from left to right towards a window, his gaze fixed on something outside. The camera follows him from behind at a medium distance. The room is brightly lit, with white walls and a large window covered by a white curtain. As he approaches the window, he turns his head slightly to the left, then back to the right. He then turns his entire body to the right, facing the window. The camera remains stationary as he stands in front of the window. The scene is captured in real-life footage."
video = pipe(
prompt=prompt,
width=704,
height=480,
num_frames=161,
num_inference_steps=50,
).frames[0]
export_to_video(video, "output.mp4", fps=24)
```
> [!TIP]
> Mochi-1 is a 10B parameter model and requires a lot of memory. Refer to the Mochi [Quantization](../api/pipelines/mochi#quantization) guide to learn how to quantize the model. CogVideoX and LTX-Video are more lightweight options that can still generate high-quality videos.
[Mochi-1](https://huggingface.co/genmo/mochi-1-preview) introduces the Asymmetric Diffusion Transformer (AsymmDiT) and Asymmetric Variational Autoencoder (AsymmVAE) to reduces memory requirements. AsymmVAE causally compresses videos 128x to improve memory efficiency, and AsymmDiT jointly attends to the compressed video tokens and user text tokens. This model is noted for generating videos with high-quality motion dynamics and strong prompt adherence.
```py
import torch
from diffusers import MochiPipeline
from diffusers.utils import export_to_video
pipe = MochiPipeline.from_pretrained("genmo/mochi-1-preview", variant="bf16", torch_dtype=torch.bfloat16)
# reduce memory requirements
pipe.enable_model_cpu_offload()
pipe.enable_vae_tiling()
prompt = "Close-up of a chameleon's eye, with its scaly skin changing color. Ultra high resolution 4k."
video = pipe(prompt, num_frames=84).frames[0]
export_to_video(video, "output.mp4", fps=30)
```
[StableVideoDiffusion (SVD)](https://huggingface.co/stabilityai/stable-video-diffusion-img2vid-xt) is based on the Stable Diffusion 2.1 model and it is trained on images, then low-resolution videos, and finally a smaller dataset of high-resolution videos. This model generates a short 2-4 second video from an initial image.
```py
import torch
from diffusers import StableVideoDiffusionPipeline
from diffusers.utils import load_image, export_to_video
pipeline = StableVideoDiffusionPipeline.from_pretrained(
"stabilityai/stable-video-diffusion-img2vid-xt", torch_dtype=torch.float16, variant="fp16"
)
# reduce memory requirements
pipeline.enable_model_cpu_offload()
image = load_image("https://huggingface.co/datasets/huggingface/documentation-images/resolve/main/diffusers/svd/rocket.png")
image = image.resize((1024, 576))
generator = torch.manual_seed(42)
frames = pipeline(image, decode_chunk_size=8, generator=generator).frames[0]
export_to_video(frames, "generated.mp4", fps=7)
```
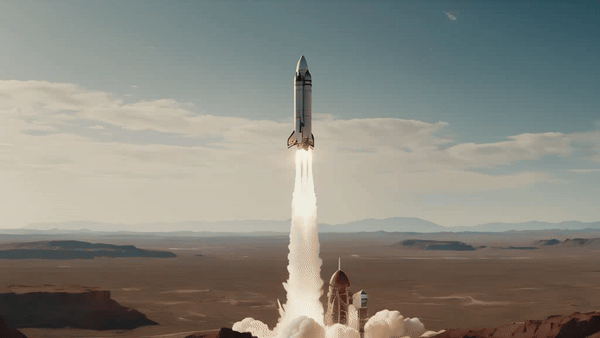
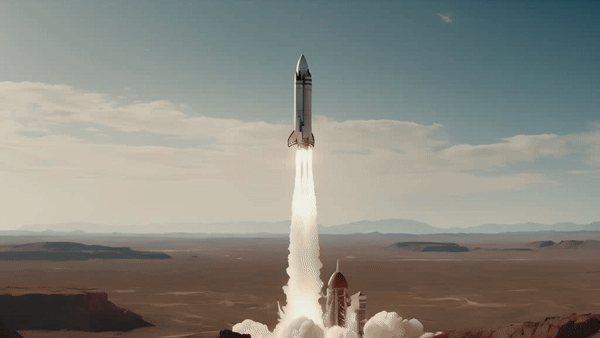
 initial image
 generated video
[AnimateDiff](https://huggingface.co/guoyww/animatediff) is an adapter model that inserts a motion module into a pretrained diffusion model to animate an image. The adapter is trained on video clips to learn motion which is used to condition the generation process to create a video. It is faster and easier to only train the adapter and it can be loaded into most diffusion models, effectively turning them into “video models”.
Load a `MotionAdapter` and pass it to the [`AnimateDiffPipeline`].
```py
import torch
from diffusers import AnimateDiffPipeline, DDIMScheduler, MotionAdapter
from diffusers.utils import export_to_gif
adapter = MotionAdapter.from_pretrained("guoyww/animatediff-motion-adapter-v1-5-2", torch_dtype=torch.float16)
pipeline = AnimateDiffPipeline.from_pretrained("emilianJR/epiCRealism", motion_adapter=adapter, torch_dtype=torch.float16)
scheduler = DDIMScheduler.from_pretrained(
"emilianJR/epiCRealism",
subfolder="scheduler",
clip_sample=False,
timestep_spacing="linspace",
beta_schedule="linear",
steps_offset=1,
)
pipeline.scheduler = scheduler
# reduce memory requirements
pipeline.enable_vae_slicing()
pipeline.enable_model_cpu_offload()
output = pipeline(
prompt="A space rocket with trails of smoke behind it launching into space from the desert, 4k, high resolution",
negative_prompt="bad quality, worse quality, low resolution",
num_frames=16,
guidance_scale=7.5,
num_inference_steps=50,
generator=torch.Generator("cpu").manual_seed(49),
)
frames = output.frames[0]
export_to_gif(frames, "animation.gif")
```
## Configure model parameters
There are a few important parameters you can configure in the pipeline that'll affect the video generation process and quality. Let's take a closer look at what these parameters do and how changing them affects the output.
### Number of frames
The `num_frames` parameter determines how many video frames are generated per second. A frame is an image that is played in a sequence of other frames to create motion or a video. This affects video length because the pipeline generates a certain number of frames per second (check a pipeline's API reference for the default value). To increase the video duration, you'll need to increase the `num_frames` parameter.
```py
import torch
from diffusers import StableVideoDiffusionPipeline
from diffusers.utils import load_image, export_to_video
pipeline = StableVideoDiffusionPipeline.from_pretrained(
"stabilityai/stable-video-diffusion-img2vid", torch_dtype=torch.float16, variant="fp16"
)
pipeline.enable_model_cpu_offload()
image = load_image("https://huggingface.co/datasets/huggingface/documentation-images/resolve/main/diffusers/svd/rocket.png")
image = image.resize((1024, 576))
generator = torch.manual_seed(42)
frames = pipeline(image, decode_chunk_size=8, generator=generator, num_frames=25).frames[0]
export_to_video(frames, "generated.mp4", fps=7)
```
 num_frames=14
 num_frames=25
### Guidance scale
The `guidance_scale` parameter controls how closely aligned the generated video and text prompt or initial image is. A higher `guidance_scale` value means your generated video is more aligned with the text prompt or initial image, while a lower `guidance_scale` value means your generated video is less aligned which could give the model more "creativity" to interpret the conditioning input.
SVD uses the `min_guidance_scale` and `max_guidance_scale` parameters for applying guidance to the first and last frames respectively.
```py
import torch
from diffusers import I2VGenXLPipeline
from diffusers.utils import export_to_gif, load_image
pipeline = I2VGenXLPipeline.from_pretrained("ali-vilab/i2vgen-xl", torch_dtype=torch.float16, variant="fp16")
pipeline.enable_model_cpu_offload()
image_url = "https://huggingface.co/datasets/diffusers/docs-images/resolve/main/i2vgen_xl_images/img_0009.png"
image = load_image(image_url).convert("RGB")
prompt = "Papers were floating in the air on a table in the library"
negative_prompt = "Distorted, discontinuous, Ugly, blurry, low resolution, motionless, static, disfigured, disconnected limbs, Ugly faces, incomplete arms"
generator = torch.manual_seed(0)
frames = pipeline(
prompt=prompt,
image=image,
num_inference_steps=50,
negative_prompt=negative_prompt,
guidance_scale=1.0,
generator=generator
).frames[0]
export_to_gif(frames, "i2v.gif")
```
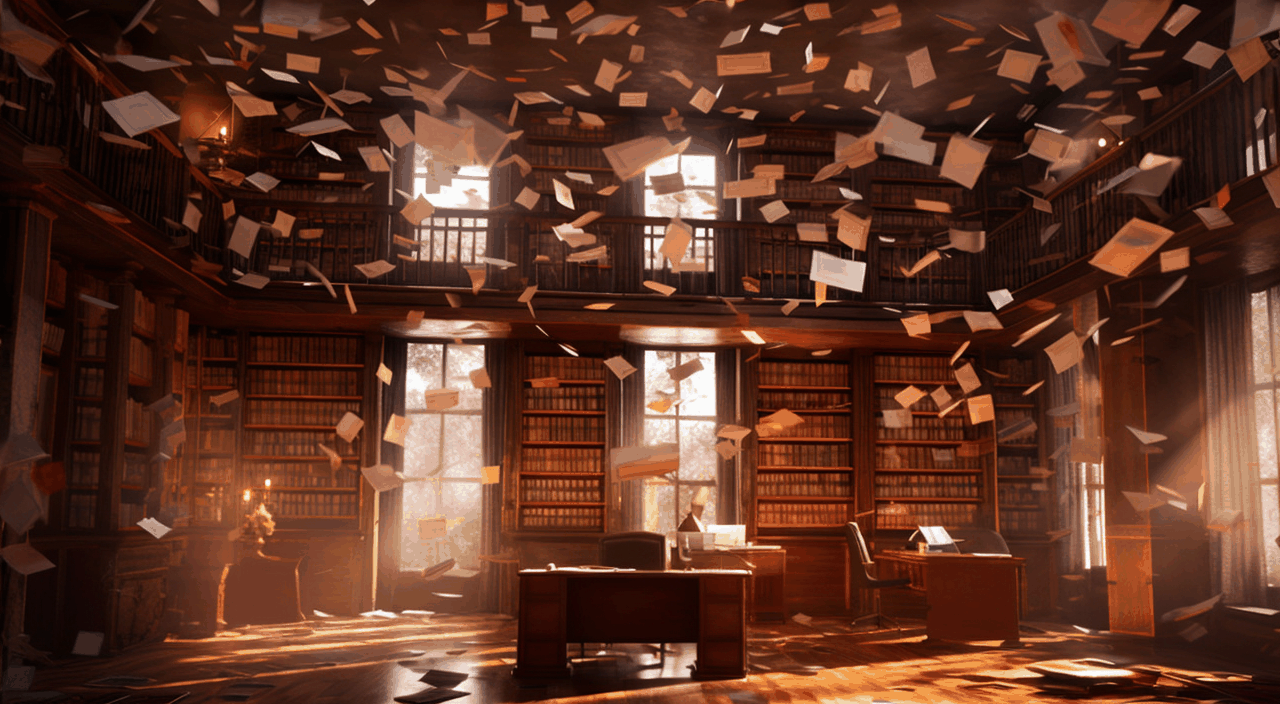 guidance_scale=9.0
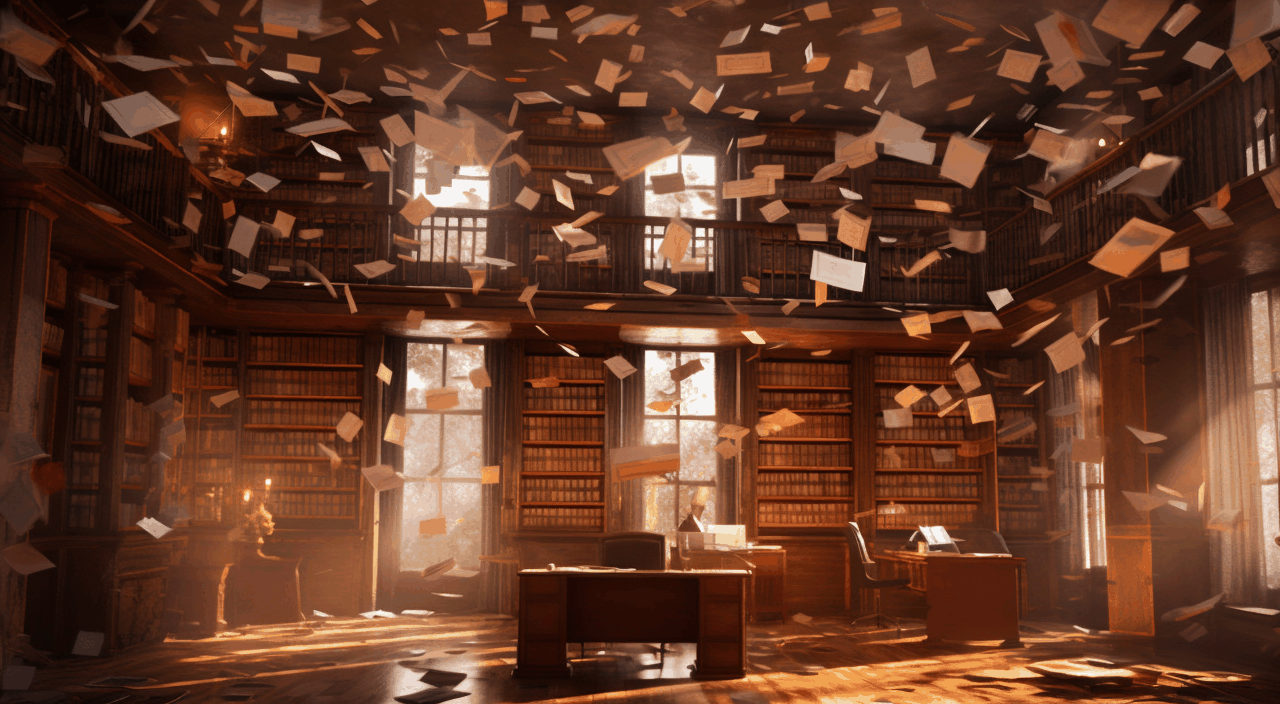 guidance_scale=1.0
### Negative prompt
A negative prompt deters the model from generating things you don’t want it to. This parameter is commonly used to improve overall generation quality by removing poor or bad features such as “low resolution” or “bad details”.
```py
import torch
from diffusers import AnimateDiffPipeline, DDIMScheduler, MotionAdapter
from diffusers.utils import export_to_gif
adapter = MotionAdapter.from_pretrained("guoyww/animatediff-motion-adapter-v1-5-2", torch_dtype=torch.float16)
pipeline = AnimateDiffPipeline.from_pretrained("emilianJR/epiCRealism", motion_adapter=adapter, torch_dtype=torch.float16)
scheduler = DDIMScheduler.from_pretrained(
"emilianJR/epiCRealism",
subfolder="scheduler",
clip_sample=False,
timestep_spacing="linspace",
beta_schedule="linear",
steps_offset=1,
)
pipeline.scheduler = scheduler
pipeline.enable_vae_slicing()
pipeline.enable_model_cpu_offload()
output = pipeline(
prompt="360 camera shot of a sushi roll in a restaurant",
negative_prompt="Distorted, discontinuous, ugly, blurry, low resolution, motionless, static",
num_frames=16,
guidance_scale=7.5,
num_inference_steps=50,
generator=torch.Generator("cpu").manual_seed(0),
)
frames = output.frames[0]
export_to_gif(frames, "animation.gif")
```
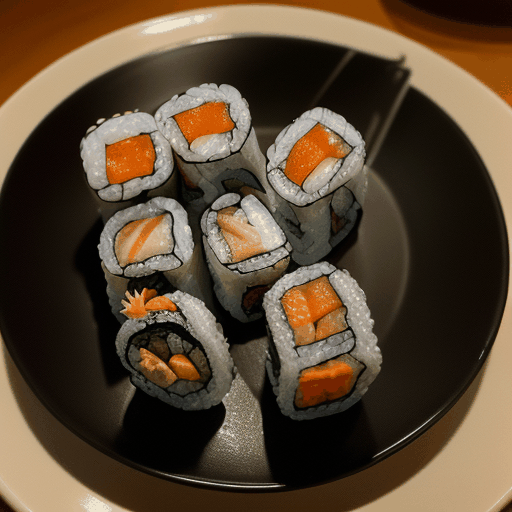 no negative prompt
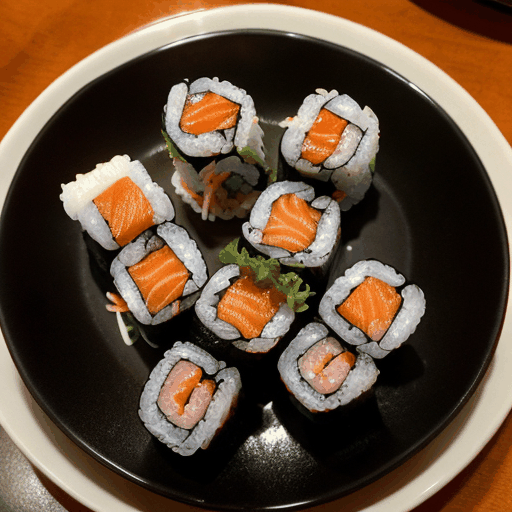 negative prompt applied
### Model-specific parameters
There are some pipeline parameters that are unique to each model such as adjusting the motion in a video or adding noise to the initial image.
Stable Video Diffusion provides additional micro-conditioning for the frame rate with the `fps` parameter and for motion with the `motion_bucket_id` parameter. Together, these parameters allow for adjusting the amount of motion in the generated video.
There is also a `noise_aug_strength` parameter that increases the amount of noise added to the initial image. Varying this parameter affects how similar the generated video and initial image are. A higher `noise_aug_strength` also increases the amount of motion. To learn more, read the [Micro-conditioning](../using-diffusers/svd#micro-conditioning) guide.
Text2Video-Zero computes the amount of motion to apply to each frame from randomly sampled latents. You can use the `motion_field_strength_x` and `motion_field_strength_y` parameters to control the amount of motion to apply to the x and y-axes of the video. The parameters `t0` and `t1` are the timesteps to apply motion to the latents.
## Control video generation
Video generation can be controlled similar to how text-to-image, image-to-image, and inpainting can be controlled with a [`ControlNetModel`]. The only difference is you need to use the [`~pipelines.text_to_video_synthesis.pipeline_text_to_video_zero.CrossFrameAttnProcessor`] so each frame attends to the first frame.
### Text2Video-Zero
Text2Video-Zero video generation can be conditioned on pose and edge images for even greater control over a subject's motion in the generated video or to preserve the identity of a subject/object in the video. You can also use Text2Video-Zero with [InstructPix2Pix](../api/pipelines/pix2pix) for editing videos with text.
Start by downloading a video and extracting the pose images from it.
```py
from huggingface_hub import hf_hub_download
from PIL import Image
import imageio
filename = "__assets__/poses_skeleton_gifs/dance1_corr.mp4"
repo_id = "PAIR/Text2Video-Zero"
video_path = hf_hub_download(repo_type="space", repo_id=repo_id, filename=filename)
reader = imageio.get_reader(video_path, "ffmpeg")
frame_count = 8
pose_images = [Image.fromarray(reader.get_data(i)) for i in range(frame_count)]
```
Load a [`ControlNetModel`] for pose estimation and a checkpoint into the [`StableDiffusionControlNetPipeline`]. Then you'll use the [`~pipelines.text_to_video_synthesis.pipeline_text_to_video_zero.CrossFrameAttnProcessor`] for the UNet and ControlNet.
```py
import torch
from diffusers import StableDiffusionControlNetPipeline, ControlNetModel
from diffusers.pipelines.text_to_video_synthesis.pipeline_text_to_video_zero import CrossFrameAttnProcessor
model_id = "stable-diffusion-v1-5/stable-diffusion-v1-5"
controlnet = ControlNetModel.from_pretrained("lllyasviel/sd-controlnet-openpose", torch_dtype=torch.float16)
pipeline = StableDiffusionControlNetPipeline.from_pretrained(
model_id, controlnet=controlnet, torch_dtype=torch.float16
).to("cuda")
pipeline.unet.set_attn_processor(CrossFrameAttnProcessor(batch_size=2))
pipeline.controlnet.set_attn_processor(CrossFrameAttnProcessor(batch_size=2))
```
Fix the latents for all the frames, and then pass your prompt and extracted pose images to the model to generate a video.
```py
latents = torch.randn((1, 4, 64, 64), device="cuda", dtype=torch.float16).repeat(len(pose_images), 1, 1, 1)
prompt = "Darth Vader dancing in a desert"
result = pipeline(prompt=[prompt] * len(pose_images), image=pose_images, latents=latents).images
imageio.mimsave("video.mp4", result, fps=4)
```
Download a video and extract the edges from it.
```py
from huggingface_hub import hf_hub_download
from PIL import Image
import imageio
filename = "__assets__/poses_skeleton_gifs/dance1_corr.mp4"
repo_id = "PAIR/Text2Video-Zero"
video_path = hf_hub_download(repo_type="space", repo_id=repo_id, filename=filename)
reader = imageio.get_reader(video_path, "ffmpeg")
frame_count = 8
pose_images = [Image.fromarray(reader.get_data(i)) for i in range(frame_count)]
```
Load a [`ControlNetModel`] for canny edge and a checkpoint into the [`StableDiffusionControlNetPipeline`]. Then you'll use the [`~pipelines.text_to_video_synthesis.pipeline_text_to_video_zero.CrossFrameAttnProcessor`] for the UNet and ControlNet.
```py
import torch
from diffusers import StableDiffusionControlNetPipeline, ControlNetModel
from diffusers.pipelines.text_to_video_synthesis.pipeline_text_to_video_zero import CrossFrameAttnProcessor
model_id = "stable-diffusion-v1-5/stable-diffusion-v1-5"
controlnet = ControlNetModel.from_pretrained("lllyasviel/sd-controlnet-canny", torch_dtype=torch.float16)
pipeline = StableDiffusionControlNetPipeline.from_pretrained(
model_id, controlnet=controlnet, torch_dtype=torch.float16
).to("cuda")
pipeline.unet.set_attn_processor(CrossFrameAttnProcessor(batch_size=2))
pipeline.controlnet.set_attn_processor(CrossFrameAttnProcessor(batch_size=2))
```
Fix the latents for all the frames, and then pass your prompt and extracted edge images to the model to generate a video.
```py
latents = torch.randn((1, 4, 64, 64), device="cuda", dtype=torch.float16).repeat(len(pose_images), 1, 1, 1)
prompt = "Darth Vader dancing in a desert"
result = pipeline(prompt=[prompt] * len(pose_images), image=pose_images, latents=latents).images
imageio.mimsave("video.mp4", result, fps=4)
```
InstructPix2Pix allows you to use text to describe the changes you want to make to the video. Start by downloading and reading a video.
```py
from huggingface_hub import hf_hub_download
from PIL import Image
import imageio
filename = "__assets__/pix2pix video/camel.mp4"
repo_id = "PAIR/Text2Video-Zero"
video_path = hf_hub_download(repo_type="space", repo_id=repo_id, filename=filename)
reader = imageio.get_reader(video_path, "ffmpeg")
frame_count = 8
video = [Image.fromarray(reader.get_data(i)) for i in range(frame_count)]
```
Load the [`StableDiffusionInstructPix2PixPipeline`] and set the [`~pipelines.text_to_video_synthesis.pipeline_text_to_video_zero.CrossFrameAttnProcessor`] for the UNet.
```py
import torch
from diffusers import StableDiffusionInstructPix2PixPipeline
from diffusers.pipelines.text_to_video_synthesis.pipeline_text_to_video_zero import CrossFrameAttnProcessor
pipeline = StableDiffusionInstructPix2PixPipeline.from_pretrained("timbrooks/instruct-pix2pix", torch_dtype=torch.float16).to("cuda")
pipeline.unet.set_attn_processor(CrossFrameAttnProcessor(batch_size=3))
```
Pass a prompt describing the change you want to apply to the video.
```py
prompt = "make it Van Gogh Starry Night style"
result = pipeline(prompt=[prompt] * len(video), image=video).images
imageio.mimsave("edited_video.mp4", result, fps=4)
```
## Optimize
Video generation requires a lot of memory because you're generating many video frames at once. You can reduce your memory requirements at the expense of some inference speed. Try:
1. offloading pipeline components that are no longer needed to the CPU
2. feed-forward chunking runs the feed-forward layer in a loop instead of all at once
3. break up the number of frames the VAE has to decode into chunks instead of decoding them all at once
```diff
- pipeline.enable_model_cpu_offload()
- frames = pipeline(image, decode_chunk_size=8, generator=generator).frames[0]
+ pipeline.enable_model_cpu_offload()
+ pipeline.unet.enable_forward_chunking()
+ frames = pipeline(image, decode_chunk_size=2, generator=generator, num_frames=25).frames[0]
```
If memory is not an issue and you want to optimize for speed, try wrapping the UNet with [`torch.compile`](../optimization/torch2.0#torchcompile).
```diff
- pipeline.enable_model_cpu_offload()
+ pipeline.to("cuda")
+ pipeline.unet = torch.compile(pipeline.unet, mode="reduce-overhead", fullgraph=True)
```
## Quantization
Quantization helps reduce the memory requirements of very large models by storing model weights in a lower precision data type. However, quantization may have varying impact on video quality depending on the video model.
Refer to the [Quantization](../../quantization/overview) to learn more about supported quantization backends (bitsandbytes, torchao, gguf) and selecting a quantization backend that supports your use case.