# T2I-Adapter
[T2I-Adapter](https://hf.co/papers/2302.08453) is a lightweight adapter for controlling and providing more accurate
structure guidance for text-to-image models. It works by learning an alignment between the internal knowledge of the
text-to-image model and an external control signal, such as edge detection or depth estimation.
The T2I-Adapter design is simple, the condition is passed to four feature extraction blocks and three downsample
blocks. This makes it fast and easy to train different adapters for different conditions which can be plugged into the
text-to-image model. T2I-Adapter is similar to [ControlNet](controlnet) except it is smaller (~77M parameters) and
faster because it only runs once during the diffusion process. The downside is that performance may be slightly worse
than ControlNet.
This guide will show you how to use T2I-Adapter with different Stable Diffusion models and how you can compose multiple
T2I-Adapters to impose more than one condition.
> [!TIP]
> There are several T2I-Adapters available for different conditions, such as color palette, depth, sketch, pose, and
> segmentation. Check out the [TencentARC](https://hf.co/TencentARC) repository to try them out!
Before you begin, make sure you have the following libraries installed.
```py
# uncomment to install the necessary libraries in Colab
#!pip install -q diffusers accelerate controlnet-aux==0.0.7
```
## Text-to-image
Text-to-image models rely on a prompt to generate an image, but sometimes, text alone may not be enough to provide more
accurate structural guidance. T2I-Adapter allows you to provide an additional control image to guide the generation
process. For example, you can provide a canny image (a white outline of an image on a black background) to guide the
model to generate an image with a similar structure.
Create a canny image with the [opencv-library](https://github.com/opencv/opencv-python).
```py
import cv2
import numpy as np
from PIL import Image
from diffusers.utils import load_image
image = load_image("https://huggingface.co/datasets/hf-internal-testing/diffusers-images/resolve/main/sd_controlnet/hf-logo.png")
image = np.array(image)
low_threshold = 100
high_threshold = 200
image = cv2.Canny(image, low_threshold, high_threshold)
image = Image.fromarray(image)
```
Now load a T2I-Adapter conditioned on [canny images](https://hf.co/TencentARC/t2iadapter_canny_sd15v2) and pass it to
the [`StableDiffusionAdapterPipeline`].
```py
import torch
from diffusers import StableDiffusionAdapterPipeline, T2IAdapter
adapter = T2IAdapter.from_pretrained("TencentARC/t2iadapter_canny_sd15v2", torch_dtype=torch.float16)
pipeline = StableDiffusionAdapterPipeline.from_pretrained(
"runwayml/stable-diffusion-v1-5",
adapter=adapter,
torch_dtype=torch.float16,
)
pipeline.to("cuda")
```
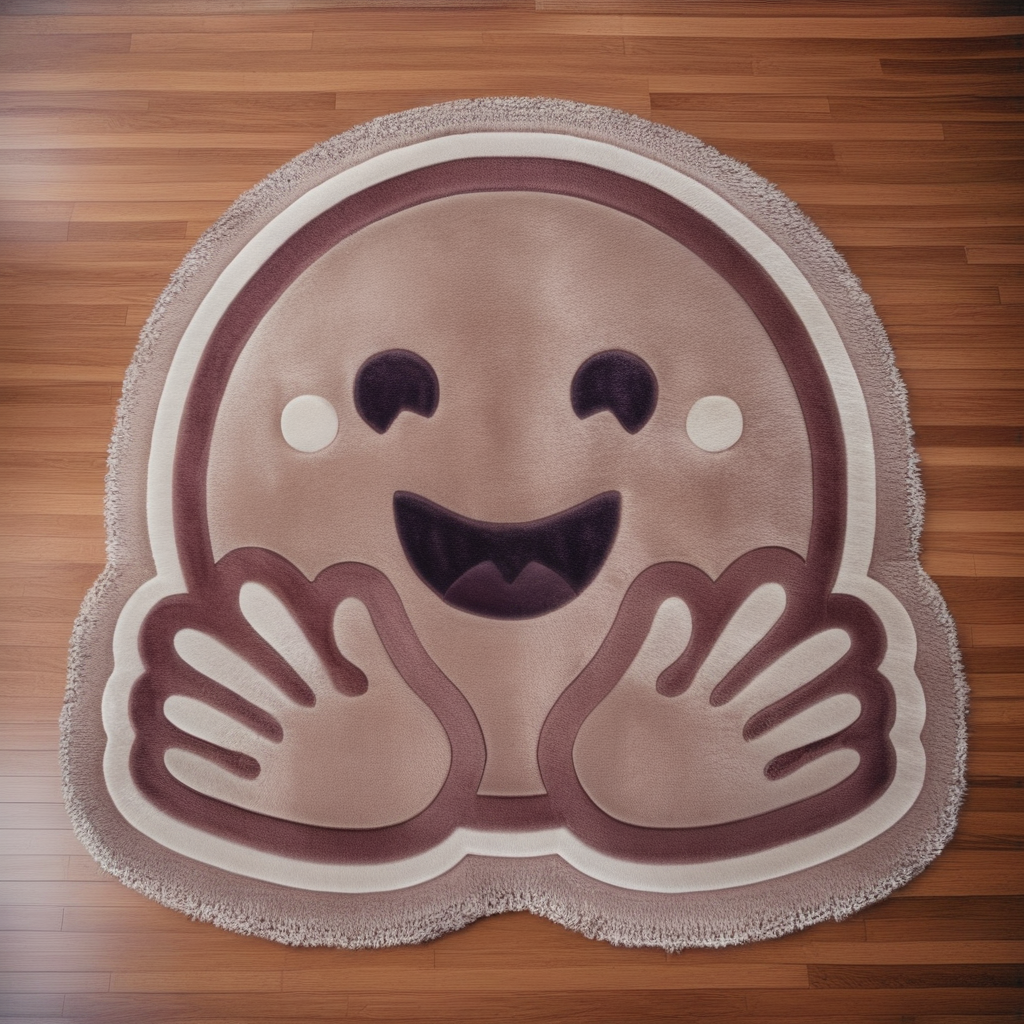
Finally, pass your prompt and control image to the pipeline.
```py
generator = torch.Generator("cuda").manual_seed(0)
image = pipeline(
prompt="cinematic photo of a plush and soft midcentury style rug on a wooden floor, 35mm photograph, film, professional, 4k, highly detailed",
image=image,
generator=generator,
).images[0]
image
```
Create a canny image with the [controlnet-aux](https://github.com/huggingface/controlnet_aux) library.
```py
from controlnet_aux.canny import CannyDetector
from diffusers.utils import load_image
canny_detector = CannyDetector()
image = load_image("https://huggingface.co/datasets/hf-internal-testing/diffusers-images/resolve/main/sd_controlnet/hf-logo.png")
image = canny_detector(image, detect_resolution=384, image_resolution=1024)
```
Now load a T2I-Adapter conditioned on [canny images](https://hf.co/TencentARC/t2i-adapter-canny-sdxl-1.0) and pass it
to the [`StableDiffusionXLAdapterPipeline`].
```py
import torch
from diffusers import StableDiffusionXLAdapterPipeline, T2IAdapter, EulerAncestralDiscreteScheduler, AutoencoderKL
scheduler = EulerAncestralDiscreteScheduler.from_pretrained("stabilityai/stable-diffusion-xl-base-1.0", subfolder="scheduler")
vae = AutoencoderKL.from_pretrained("madebyollin/sdxl-vae-fp16-fix", torch_dtype=torch.float16)
adapter = T2IAdapter.from_pretrained("TencentARC/t2i-adapter-canny-sdxl-1.0", torch_dtype=torch.float16)
pipeline = StableDiffusionXLAdapterPipeline.from_pretrained(
"stabilityai/stable-diffusion-xl-base-1.0",
adapter=adapter,
vae=vae,
scheduler=scheduler,
torch_dtype=torch.float16,
variant="fp16",
)
pipeline.to("cuda")
```
Finally, pass your prompt and control image to the pipeline.
```py
generator = torch.Generator("cuda").manual_seed(0)
image = pipeline(
prompt="cinematic photo of a plush and soft midcentury style rug on a wooden floor, 35mm photograph, film, professional, 4k, highly detailed",
image=image,
generator=generator,
).images[0]
image
```
## MultiAdapter
T2I-Adapters are also composable, allowing you to use more than one adapter to impose multiple control conditions on an
image. For example, you can use a pose map to provide structural control and a depth map for depth control. This is
enabled by the [`MultiAdapter`] class.
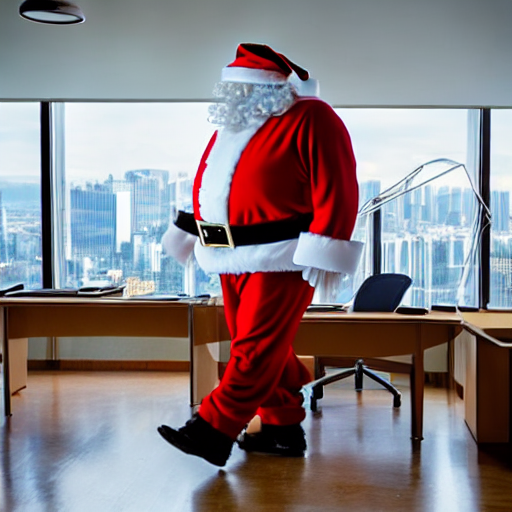
Let's condition a text-to-image model with a pose and depth adapter. Create and place your depth and pose image and in a list.
```py
from diffusers.utils import load_image
pose_image = load_image(
"https://huggingface.co/datasets/diffusers/docs-images/resolve/main/t2i-adapter/keypose_sample_input.png"
)
depth_image = load_image(
"https://huggingface.co/datasets/diffusers/docs-images/resolve/main/t2i-adapter/depth_sample_input.png"
)
cond = [pose_image, depth_image]
prompt = ["Santa Claus walking into an office room with a beautiful city view"]
```
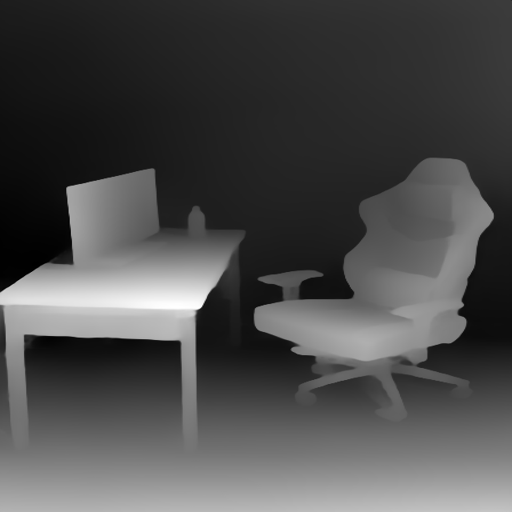 depth image
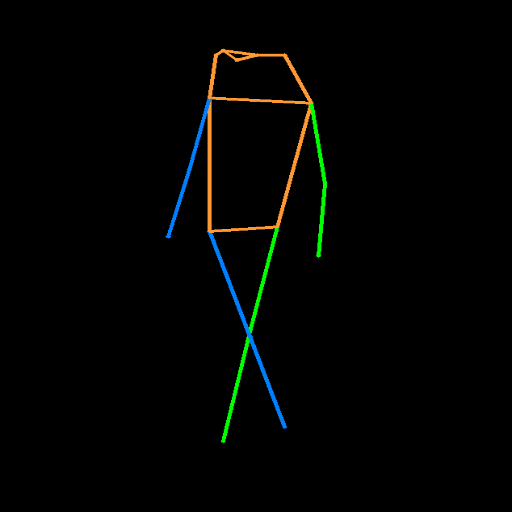 pose image
Load the corresponding pose and depth adapters as a list in the [`MultiAdapter`] class.
```py
import torch
from diffusers import StableDiffusionAdapterPipeline, MultiAdapter, T2IAdapter
adapters = MultiAdapter(
[
T2IAdapter.from_pretrained("TencentARC/t2iadapter_keypose_sd14v1"),
T2IAdapter.from_pretrained("TencentARC/t2iadapter_depth_sd14v1"),
]
)
adapters = adapters.to(torch.float16)
```
Finally, load a [`StableDiffusionAdapterPipeline`] with the adapters, and pass your prompt and conditioned images to
it. Use the [`adapter_conditioning_scale`] to adjust the weight of each adapter on the image.
```py
pipeline = StableDiffusionAdapterPipeline.from_pretrained(
"CompVis/stable-diffusion-v1-4",
torch_dtype=torch.float16,
adapter=adapters,
).to("cuda")
image = pipeline(prompt, cond, adapter_conditioning_scale=[0.7, 0.7]).images[0]
image
```